You’ve noticed cracks in your asphalt driveway and it’s time to patch them up. But where do you start?
Don’t worry, we’ve got you covered. This guide will walk you through the process of placing an asphalt driveway patch, from understanding how damage occurs to the tools you’ll need, and even the common mistakes to avoid.
By the end of your home improvement project, you’ll be able to patch your asphalt driveway like a pro. It’s easier than you think, and we’re here to help.
Understanding Asphalt Driveway Damages
You’ve got to recognize that asphalt cracks aren’t just an eyesore, they’re a sign of asphalt driveway damages which can worsen over time if you don’t address them. Think of them as symptoms, like a fever or cough is to an illness. They’re telling you that something is wrong, and if you ignore it, you’re only allowing the problem to grow.
Water is the enemy of your driveway. It seeps into those small cracks, causing them to expand and deepen. That’s when you start seeing potholes and crumbling edges. It’s not just about aesthetics, either. Those damages can affect the structural integrity of your driveway, causing it to fail prematurely.
But it’s not all doom and gloom. You can prevent and fix these damages. Regular maintenance, including cleaning and sealing your driveway, can keep those cracks at bay. And if they’re already there? Don’t panic. There are patching products available that can fill in those cracks and prevent further damage.
The Importance of Regular Driveway Maintenance
Let’s delve into why regular maintenance of your driveway is crucial for its longevity and aesthetics.
Like any other part of your home, your driveway undergoes wear and tear. It’s exposed to harsh weather conditions, heavy vehicles, and foot traffic, which can cause cracks, potholes, and other damages.
Proper maintenance isn’t just about keeping your driveway looking good—it’s about extending its lifespan. Regularly sealing cracks and repairing potholes can prevent the damage from spreading and worsening. It can save you from costly asphalt repairs or even a complete replacement in the long run.
Ignoring minor damages can lead to major problems. Water can seep into the cracks, freeze and expand, causing further damage. This could lead to a rough and unsafe surface, posing risks to vehicles and pedestrians.
By taking a proactive approach to your driveway’s upkeep, you’re not just preserving its appearance but also its functionality, safety, and durability. So, don’t wait for noticeable damage before you act. Regular maintenance keeps your driveway in top shape and serves as a preventive measure against costly problems.
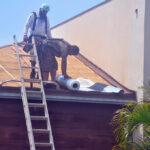
Tools and Materials Required for Asphalt Driveway Patching
To patch your asphalt driveway effectively, you’ll need a handful of specific tools and materials. These will ensure you’re equipped to handle the task professionally and achieve a smooth, seamless finish.
To get the job done right, here’s a list of the tools and materials you’ll need:
Cold patch
This is the primary material you’ll use to fill up the holes and cracks in your driveway.
A shovel or garden trowel
You’ll need this to scoop out the cold asphalt patch and spread it evenly over the damaged areas.
A hand tamp or vibratory plate compactor
This tool helps to compress the patch material into the blacktop, making sure it’s well compacted and level with the rest of the driveway.
A broom or leaf blower
This is used to clean the driveway before you start the patching process. It’s essential to remove all debris for the patch to adhere properly.
Protective gear
Don’t forget your work gloves, safety glasses, and sturdy shoes to protect yourself while working.
With these tools and materials at hand, you’re all set to patch up your asphalt driveway like a pro. It’s easier than you think, and you’ll save a ton by doing it yourself.
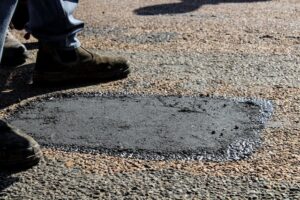
Step-by-Step Guide to Asphalt Driveway Patching
Before diving into the process of patching, it’s crucial for you to understand that proper preparation is key to a successful outcome. The first step is to clean the area that needs patching. This includes removing any loose debris and cleaning out any cracks.
Next, you’ll need to apply a primer to the area. This will help the patching material adhere to the asphalt. After the primer has dried, you can apply the patching material using a trowel. Make sure you press the patching material firmly into the crack or hole to ensure a tight seal.
Once the patching material has dried, you’ll need to seal the area. This will protect the patching material and help to prevent future damage. You can use a roller to apply the sealant evenly across the surface.
Tips to Ensure a Successful Asphalt Patch
Often, you’ll find that doing thorough prep work and using high-quality materials are key to ensuring a successful asphalt driveway patch. However, there are also other factors you should consider to make sure your patch job lasts.
Here are some tips that can help you get the job done right:
Choose the right time
Aim to patch your driveway when the weather’s dry and warm. Asphalt sets best in these conditions.
Clean the area
Before you start, make sure the area’s free of dirt, leaves, or other debris. You can use a broom or leaf blower to clean the surface.
Use the right tools
Some essential tools you’ll need are a squeegee or trowel for spreading the patch material and a tamper for compacting it.
Apply a sealant
After your patch has cured, consider applying a sealer to protect the pavement from the elements.
Maintain your driveway
Regular maintenance goes a long way in prolonging the life of your patch. This includes cleaning the driveway regularly and applying a sealant every 2-3 years.
Common Mistakes to Avoid When Patching an Asphalt Driveway
In patching your asphalt driveway, it’s crucial that you’re aware of common mistakes to avoid ensuring a durable and long-lasting repair. One frequent blunder is neglecting to clean the area before you start. Any dirt or debris left in the pothole can prevent the new asphalt from adhering properly, leading to a weak patch job.
You might also think that larger cracks don’t require any special treatment, but that’s not the case. Failing to use a crack filler before applying the patching material is a common pitfall. These fillers help to seal the crack and provide a strong base for the patch.
Another mistake is choosing the wrong patching material. Not all products are created equal, and some are better suited to certain types of damage than others. Make sure you’re using the right one for your specific needs.
Lastly, don’t rush the curing process. It’s tempting to use the driveway immediately after patching, but this can cause the new asphalt to break down. Be patient and give it the time it needs to fully set.
Long-Term Care and Maintenance for Your Patched Asphalt Driveway
After patching your asphalt driveway, it’s essential to establish a routine of long-term care and maintenance to preserve the quality and durability of your repair. The more attention you give it, the longer your driveway will last.
So, what can you do to ensure your driveway stands the test of time? Follow these five critical steps:
– Regularly inspect your driveway for signs of wear and tear. Small cracks can quickly escalate into more significant problems if left untreated.
– Clean your driveway often. Removing dirt, leaves, and other debris prevents them from seeping into the asphalt and causing damage.
– Apply a sealant every two to three years. This protective layer shields your driveway from harmful UV rays, water damage, and oil spills.
– Fix minor issues promptly. Even the tiniest crack can turn into a major repair if not addressed quickly.
– Stay mindful of weight limits. Consistently parking heavy vehicles on your driveway can lead to surface fractures over time.
Furthermore, hiring a professional contractor to maintain your patched asphalt driveway can be a wise decision. These contractors have the expertise and experience to properly assess the condition of your driveway and provide the necessary repairs and maintenance. Contact Advanced Asphalt of SW FL as they can identify and fix any underlying issues that may be causing damage to your driveway, such as drainage problems or heavy traffic.
Aside from that, their team of experts have access to high-quality materials and equipment that can significantly improve the durability and longevity of your patched asphalt driveway. By entrusting the maintenance of your driveway to a them, you can ensure that it remains in good condition and avoid costly repairs in the long run.
Conclusion
So, you’ve patched up your asphalt driveway. That’s great! Remember, keeping it in top shape involves regular maintenance. Avoid common mistakes and use the right tools for patching. And don’t forget about long-term care.
With diligence, a little bit of elbow grease, and help from an experienced contractor, your driveway will always look its best.